I've been off learning a new hobby! I'm happy to finally share the results here. Introducing my new porch furniture (and porch, which is 75% complete) ...
Yep! I taught myself how to build furniture. It's a hobby that's been on my wishlist for a little over a year and I think it was these very chairs that made me want to start. I found a really cool website called www.ana-white.com and I immediately started dreaming of what I could do. She makes it look easy and doable. I caught her bug, bought a few tools and now I have furniture for my porch! Yippee!
I had to resize the original plans because they were written to fit cushions from Restoration Hardware. Lord knows I don't have the cash for that, so I resized the chairs to fit cushions purchased from Walmart. (See dimensions and cut lists at the bottom of the post)
I resized the loveseat and used Walmart cushions for the seat backs and a crib mattress for the seat.
I picked up fabric from JoAnn's (50% off end-of-season outdoor fabric. Wee!) and recovered the cushions so that it would all match nicely. Mom and Dad came into town last week (so fun!). Mom recovered the cushions for the loveseat. She did a perfect job, as always. I always realize I still have a lot to learn when I watch her sew.
My Dad is a fabulous woodworker. He gave me so many great tips about using my table saw and how to prevent splitting the wood. Loved spending time with him.
The chair design does not yield particularly sturdy chairs. Others had worried about it in the comments of the plans. And I experienced the cause for concern - after a couple of uses I had both a chair arm and a loveseat arm pop off the front. That's not good. Mom and Dad brainstormed with me and suggested some metal brackets to help hold things into place. We added "L" brackets to all of the arms.
We also added "mending braces" to the backs of all the back/seat joints. It seems to add a sufficient level of sturdiness.
I also added three more cleats to the seat of the love seat. It originally called for a cleat on both ends, but the boards really bowed in the middle. I added three 2x4s throughout to provide a total of five cleats for the seat.
I'm a bit wary still about the sturdiness of the chairs (as any chair builder is, I'm sure), but they look and feel great. Here's to hoping all of the concern is just in my head.
The old porch was such an eyesore! I hated it! While the parents were in town we tore down the screen and old railings. We still need to add the top of the railings and add some paint.
Nevertheless, I'm ecstatic about this new space. It's perfect for quiet mornings, evenings and dinnertime entertaining. It just might be my new favorite part of the house.
So, for those who may care, here are my revised cut lists:
Bristol Lounge Chair using Walmart Cushions
Seat Cushion - 24" x 24" x 5.5"
Back Cushion - 21" x 21"x 4.5"
Two 1x8 @ 21" (front and back of seat)
Two 1x4 @ 9.25" (back legs)
Two 1x4 @ 21" (front legs)
Two 1x8 @ 24" (sides of seat)
Four 1x3 @ 2" (leg attachments)
Two 1x4 @ 26.5" (sides of back)
Six 1x4 @ 21" (back slats) - .75" between slats
Two 1x4 @ 28 1/8" (arms)
Two 2x2 @ approx 24" (cleats)
Six 1x4 @ 26.5" (seat slats) - .6" between slats
Bristol Loveseat using Walmart Cushions and Crib Mattress
Seat Cushion - 27" x 52" x 5.5"
Back Cushion - 21" x 21" x 4.5"
Two 1x8 @ 45" (front and back of seat)
Two 1x4 @ 9.25" (back legs)
Two 1x4 @ 21" (front legs)
Two 1x8 @ 26.75" (sides of seat)
Four 1x3 @ 2" (leg attachments)
Two 1x4 @ 26.25" (sides of back)
Six 1x4 @ 20.75" (back slats) - .5" between slats
Two 1x4 @ 30 1/8" (arms)
Two 2x2 @ approx 26.75" (side cleats)
Three 2x4 @ approx 26.75" (middle cleats)
Seven 1x4 @ approx 50.5" (seat slats) - .5" between slats
Showing posts with label Creating. Show all posts
August 25, 2013
February 14, 2013
Valentine Craft Fail
Happy Valentine's Day!
Over the weekend we tried a little valentine craft. I enjoy thinking up these little crafts for Jude. Hopefully someday he might spend longer than 5 minutes actually doing them, but nevertheless I get a kick out of it.
We sent valentines to our grandparents and great-grandmothers this year. My little craft idea was pretty simple - print hearts (4.25" x 5.5"), outline in white crayon, let Jude paint with watercolor and cut them out.
It was pretty successful for a toddler project. Well, minus the fact that he kept choosing black paint over and over again! How are you supposed to wish someone a Happy Valentine's Day with a black heart?!
Oh well. You can't micromanage the creative process, right?
After the watercolors we also tried some potato stamping.
As you can see I cut the heart stamp a little too short and fat. Unfortunately it looked more like a butt when you stamped it on the paper. Bummer.
Black hearts and butts. Welcome to valentine's day at the Tinks.
Jude smeared it all around anyway. Course, when you think about it, smearing red paint on cards is not exactly a great solution. Turns out smeared red paint looks like blood. (You would think I would have learned my lesson last year?)
Wow, I am just now realizing in this very second, we reached a whole new low with this project - black hearts, butts AND blood.
Official Valentine FAIL.
Yes, we did actually send them.
Hmmm ... how do I redeem valentine's day after such a craft fail? Oh, I know, how 'bout an adorable picture of our 3 month old . . .
Yes, those are heart sweater tights. Phew ... valentine's day is saved by sweater tights. Thank God for little girls.
Over the weekend we tried a little valentine craft. I enjoy thinking up these little crafts for Jude. Hopefully someday he might spend longer than 5 minutes actually doing them, but nevertheless I get a kick out of it.
We sent valentines to our grandparents and great-grandmothers this year. My little craft idea was pretty simple - print hearts (4.25" x 5.5"), outline in white crayon, let Jude paint with watercolor and cut them out.
It was pretty successful for a toddler project. Well, minus the fact that he kept choosing black paint over and over again! How are you supposed to wish someone a Happy Valentine's Day with a black heart?!
Oh well. You can't micromanage the creative process, right?
After the watercolors we also tried some potato stamping.
As you can see I cut the heart stamp a little too short and fat. Unfortunately it looked more like a butt when you stamped it on the paper. Bummer.
Black hearts and butts. Welcome to valentine's day at the Tinks.
Jude smeared it all around anyway. Course, when you think about it, smearing red paint on cards is not exactly a great solution. Turns out smeared red paint looks like blood. (You would think I would have learned my lesson last year?)
Wow, I am just now realizing in this very second, we reached a whole new low with this project - black hearts, butts AND blood.
Official Valentine FAIL.
Yes, we did actually send them.
Hmmm ... how do I redeem valentine's day after such a craft fail? Oh, I know, how 'bout an adorable picture of our 3 month old . . .
Yes, those are heart sweater tights. Phew ... valentine's day is saved by sweater tights. Thank God for little girls.
December 22, 2012
A Little of This and a Little of That
Ahh! Here I am back at my computer with uploaded pictures and enough energy to write a little. Feels good. As of last week little miss is sleeping through the night! What?! I know. I know. I didn't think it was possible at 2 months either, but it's happening and I am a better person because of it! She's doing a solid 8-10 hours. Crazy!
She started smiling about two weeks ago. What a joy! There's nothing like that first smile that helps get you through the sleep depravity, screaming and poopy diapers.
Yesterday we were just talking about what a good baby she is. That was a mistake because today she gave us a run for our money. Wow. Lots of screaming around here. Hopefully we get back to "good baby" before we travel for Christmas. We'll see.
I've been fitting in a little bit of crafting/sewing here and there during the last month - mostly because it helps to keep my head on straight. It tends to be my little escape from the more responsible things in life (i.e. dishes and laundry)
Two weeks ago I designed Christmas cards/birth announcements. I sent them off to moxicopy.com to get color printed. The price was fantastic and the quality was just what I hoped for! I cut and folded them this week and finally got them sent on Thursday. Hopefully they will arrive to their destinations by Christmas.
We had a blizzard roll through on Wednesday night. So, we got a couple of days with Jesse home from work. Yay! With a little extra help with the kids I spent a bit of time putting Ellie's memory book together. My mother-in-law purchased a book from the same etsy shop where I purchased Jude's. The books is a perfect combination of scrapbooking and journaling - not too much of either. I love writing down my thoughts about pregnancy, anticipation, arrival, etc. I look forward to the day when I get to read through them with the kids too.
Lastly, I have to share one of the coolest gifts ever! A gal from our church gave us this gift:
snowman accessories! How cute is that? It came in this adorable bag:
We tried to go outside today to put our new gift to use, but the snow was a little too dry. Plus Ellie was screaming, so the timing wasn't quite right. Hopefully we can use it soon!
I totally recommend this gift if you still need a creative idea for a family. The contents of the bag include a scarf, a hat (not pictured), two buttons for eyes, five buttons for a mouth, a carrot, a pipe and a heart. The buttons and the heart are attached to short dowels that can be poked into the snowman so they stay in place. I might be late to the party, but I have to say I've never seen this idea before. It's SO cute!
She started smiling about two weeks ago. What a joy! There's nothing like that first smile that helps get you through the sleep depravity, screaming and poopy diapers.
Yesterday we were just talking about what a good baby she is. That was a mistake because today she gave us a run for our money. Wow. Lots of screaming around here. Hopefully we get back to "good baby" before we travel for Christmas. We'll see.
I've been fitting in a little bit of crafting/sewing here and there during the last month - mostly because it helps to keep my head on straight. It tends to be my little escape from the more responsible things in life (i.e. dishes and laundry)
Two weeks ago I designed Christmas cards/birth announcements. I sent them off to moxicopy.com to get color printed. The price was fantastic and the quality was just what I hoped for! I cut and folded them this week and finally got them sent on Thursday. Hopefully they will arrive to their destinations by Christmas.
We had a blizzard roll through on Wednesday night. So, we got a couple of days with Jesse home from work. Yay! With a little extra help with the kids I spent a bit of time putting Ellie's memory book together. My mother-in-law purchased a book from the same etsy shop where I purchased Jude's. The books is a perfect combination of scrapbooking and journaling - not too much of either. I love writing down my thoughts about pregnancy, anticipation, arrival, etc. I look forward to the day when I get to read through them with the kids too.
Lastly, I have to share one of the coolest gifts ever! A gal from our church gave us this gift:
snowman accessories! How cute is that? It came in this adorable bag:
We tried to go outside today to put our new gift to use, but the snow was a little too dry. Plus Ellie was screaming, so the timing wasn't quite right. Hopefully we can use it soon!
I totally recommend this gift if you still need a creative idea for a family. The contents of the bag include a scarf, a hat (not pictured), two buttons for eyes, five buttons for a mouth, a carrot, a pipe and a heart. The buttons and the heart are attached to short dowels that can be poked into the snowman so they stay in place. I might be late to the party, but I have to say I've never seen this idea before. It's SO cute!
October 15, 2012
Room is Ready
Today I finally feel ready to show off little girl's room. There are probably little details here and there that I'll be adding, but it's as ready as it will ever be to hold and comfort a new little life.
This is the view from the door. The color scheme is coral, orange and yellow and the main fabric in the room is a dark coral linen. I'm kind of obsessed with this fabric. If I wasn't using yards of it for the crib skirt, glider and changing pad I would be draping myself with it and wearing it everyday. The depth of the color is fabulous. And, of course, you can't go wrong with linen.
The crib is a recent craigslist purchase - I really love the style.
We're borrowing the glider from our fabulous neighbors. I just need to recover those cushions. (Good thing Mom comes into town tomorrow!)
I made the crib skirt using this tutorial. The crib bumper is the same one I made for Jude (so classic - I knew I would love it just as much the second time around). The knitted blanket was a lucky garage sale find - it's so cozy and cute.
This is the view our little one will wake up to every morning. I think I should hang them over my own bed. They're so cheerful and happy. I purchased the Martha Stewart coral pom poms on sale at Hancock. Then, I made the yellow and orange in the same dimensions to match.
This is just a funny idea I had in my head around the same time I was spending time in my garage painting poppies. Essentially it's a combination of a 1x6, 5 beer bottles and some coffee filter flowers. I like what it adds to the room - makes me smile.
We got lucky and got this lovely dresser on craigslist. It even came with a mirror that we'll be using to replace the one in the bathroom. Two birds with one stone - love that! I painted the dresser yellow and added the new hardware.
This is the same mobile I hung in Jude's room. I found some paint chips in my color scheme and changed the mobile to match the room. After I completed it I wasn't so sure about it - the ombre effect I was going for didn't turn out like the vision I had in my head. When Mom was in town, though, she convinced me to hang it, and she was totally right. Plus, the changing table is the perfect place for it.
The other side of the room houses a whole bunch of books and my favorite piece - the poppies painting. The painting is rather heavy so it makes the most sense to hang it over the bookshelf (rather than the crib or changing table).
On the bookshelf is a series of Childcraft books given to us by Jesse's Grandma. They are fabulous! Not only are they beautiful they also have vintage-y cool stuff inside. They're kind of like encyclopedias for kids. I really love flipping through them. I hope little girl will find them fun to read someday too.
And the rest is just a hodge podge of pregnancy/parenting books, children's books and a tiny little "love" print I made last week.
We're so excited to welcome our new little girl. I can't wait to snuggle her, kiss her and tell her how beautiful she is. Only 3 more sleeps!
This is the view from the door. The color scheme is coral, orange and yellow and the main fabric in the room is a dark coral linen. I'm kind of obsessed with this fabric. If I wasn't using yards of it for the crib skirt, glider and changing pad I would be draping myself with it and wearing it everyday. The depth of the color is fabulous. And, of course, you can't go wrong with linen.
The crib is a recent craigslist purchase - I really love the style.
We're borrowing the glider from our fabulous neighbors. I just need to recover those cushions. (Good thing Mom comes into town tomorrow!)
I made the crib skirt using this tutorial. The crib bumper is the same one I made for Jude (so classic - I knew I would love it just as much the second time around). The knitted blanket was a lucky garage sale find - it's so cozy and cute.
This is the view our little one will wake up to every morning. I think I should hang them over my own bed. They're so cheerful and happy. I purchased the Martha Stewart coral pom poms on sale at Hancock. Then, I made the yellow and orange in the same dimensions to match.
This is just a funny idea I had in my head around the same time I was spending time in my garage painting poppies. Essentially it's a combination of a 1x6, 5 beer bottles and some coffee filter flowers. I like what it adds to the room - makes me smile.
We got lucky and got this lovely dresser on craigslist. It even came with a mirror that we'll be using to replace the one in the bathroom. Two birds with one stone - love that! I painted the dresser yellow and added the new hardware.
This is the same mobile I hung in Jude's room. I found some paint chips in my color scheme and changed the mobile to match the room. After I completed it I wasn't so sure about it - the ombre effect I was going for didn't turn out like the vision I had in my head. When Mom was in town, though, she convinced me to hang it, and she was totally right. Plus, the changing table is the perfect place for it.
The other side of the room houses a whole bunch of books and my favorite piece - the poppies painting. The painting is rather heavy so it makes the most sense to hang it over the bookshelf (rather than the crib or changing table).
On the bookshelf is a series of Childcraft books given to us by Jesse's Grandma. They are fabulous! Not only are they beautiful they also have vintage-y cool stuff inside. They're kind of like encyclopedias for kids. I really love flipping through them. I hope little girl will find them fun to read someday too.
And the rest is just a hodge podge of pregnancy/parenting books, children's books and a tiny little "love" print I made last week.
We're so excited to welcome our new little girl. I can't wait to snuggle her, kiss her and tell her how beautiful she is. Only 3 more sleeps!
August 28, 2012
Crates for Toys
I've been putting together Jude's toddler room and baby girl's room simultaneously. Jude's room was my last room (minus the basement) to decorate in the house. It has been in a very sad and plain state for the last year. Awhile ago Jesse told me he wanted to decorate it with a John Deere theme, which put the project on hold because it took me a long time to wrap my brain around that. Not being an Iowa native it's not quite as natural for me to put kelly green and bright yellow in the same room - in fact the idea made me twitch. However, after lots of chatting, compromising and painting it's finally finished (with only a couple of small details yet to be accomplished), so I'll show it off tomorrow.
In the meantime, I have to brag about my first legitimate woodworking project. Dad, this one's for you - you'll have to tell me what you think. I built four crates for his room - three to hold his toys and one for his books.
These three line the edge of his bed.
This one holds his books and acts as his nightstand.
Through the Shanty 2 Chic website I found another one called Ana White. She has a million free project plans - plus she does a great job of telling beginners how to get started. After looking through her site I just couldn't help myself but get to the store, buy a few essential tools and start building.
I worked on the crates off and on over the last couple of weeks. I probably spent 12 hours total on them. They're not perfect. I certainly split the wood here and there and my handles look a little shabby, but I got better with each one I put together.
All in all I'm pleased with the result and even more pleased to have tried something new!
In the meantime, I have to brag about my first legitimate woodworking project. Dad, this one's for you - you'll have to tell me what you think. I built four crates for his room - three to hold his toys and one for his books.
These three line the edge of his bed.
This one holds his books and acts as his nightstand.
Through the Shanty 2 Chic website I found another one called Ana White. She has a million free project plans - plus she does a great job of telling beginners how to get started. After looking through her site I just couldn't help myself but get to the store, buy a few essential tools and start building.
I worked on the crates off and on over the last couple of weeks. I probably spent 12 hours total on them. They're not perfect. I certainly split the wood here and there and my handles look a little shabby, but I got better with each one I put together.
All in all I'm pleased with the result and even more pleased to have tried something new!
August 26, 2012
Nesting
I'm definitely nesting these days. It's so cliche, but it's funny how a pregnant woman just can't help herself at this stage. I took the picture above at 30 weeks. The little girl is moving around a lot, making my lower back sore by the end of the day and giving me insomnia between 4-6 am. All in all it's going well. Well, besides the fact that my hair looks like a mane. My word, I think my hair is using this picture to beg me for a haircut. It's working.
Anyway, I've been working on the kids' rooms during the last couple of weekends. For the nursery I feel inspired by poppies and the color combination coral, orange and yellow. I'm excited.
A couple of weeks ago I made this painting for her room.
I was inspired by a blog I found recently called Shanty 2 Chic. These ladies use power tools like no one's business and build everything under the sun - at least it seems like it. I'm totally inspired and I couldn't help picking up the circular saw, hammer and electric sander to put this together.
Jesse was amused to find his 7 month pregnant wife in the garage with the circular saw. I was thoroughly enjoying myself. Don't worry . . . I watched a couple of you tube videos about how to use it and I read the manual from front to back before I picked it up. That's enough preparation to prevent me from cutting off any extremities, right?
Anyway, I found this picture in a google images search and thought it would be fun to recreate it. (I can't seem to find it again to link to the source.)
Then, I found this wall hanging and decided I would build one similar to act as my canvas. So, I bought my supplies, cut the wood, pieced them together, painted them and then I was ready to draw and paint.
I used the "grid" technique that we learned in jr. high to draw the image large enough for my canvas. I had to add a couple more flowers to change it from a portrait to a landscape image. Once I was finished I taped it to the wood and traced over it.
The tracings made indentations in the wood so I could see where to apply my paint. I just used some cheap acrylics I had on hand to fill it in. I forgot how fun it was to paint. It's been so long since I've pulled out the paintbrushes to do anything beyond freezer paper painting.
Lastly, I sanded it down to distress the finish of the paint just a little. Then, I topped it off with a clear coat of varnish.
We'll hang it on the wall soon. I can't wait to see it all come together.
June 2, 2012
Dino Party
Jude turned two about two weeks ago. I threw together this little birthday party for he and his cousin, Lincoln. His cousin was born almost exactly the year before. They love to play together and Lincoln was excited to celebrate his birthday party with Jude. Jude, on the other hand, doesn't know the difference.
In the last 6 months or so Jude started to give a good "ROAR" anytime he sees a dino or something similar. Uncle Cory originally taught him this skill and he hasn't given it up. I love it, so I decided to use it as our theme.
When I originally showed him these invitations he looked carefully, paused and let out a good "ROAR". It was so perfectly timed I wish I could have caught it on video.
I derived the front of the invitation from an etsy seller, but I can't seem to locate them again. It's simple and easy. I added the red and white stripes to the back to match a tablecloth I already had on hand.
Three balloons for Lincoln and two for Jude. I ran across these little dino sippy cups at Menards of all places. They worked perfectly with the theme so I couldn't resist!
The party hats and the cupcakes were ideas from this gal. Her party was WAY cuter than mine. Great ideas over there. You can't really see Lincoln's hat very well, but it has spikes along the back. He really wanted to "smile" for me and wouldn't turn around completely for me to see his hat. Funny boy. Anyway, they turned out pretty cute.
I think the cupcakes were my favorite. I picked up the mini dinos at the dollar store and then just made cupcakes from box mix. It's funny how piping frosting on the top makes them look like I worked hours on them! I didn't.
The boys enjoyed themselves thoroughly. The party was a bit chaotic, but we had a good time.
Happy birthday to you, Mr. Jude. You make us SO happy!
In the last 6 months or so Jude started to give a good "ROAR" anytime he sees a dino or something similar. Uncle Cory originally taught him this skill and he hasn't given it up. I love it, so I decided to use it as our theme.
When I originally showed him these invitations he looked carefully, paused and let out a good "ROAR". It was so perfectly timed I wish I could have caught it on video.
I derived the front of the invitation from an etsy seller, but I can't seem to locate them again. It's simple and easy. I added the red and white stripes to the back to match a tablecloth I already had on hand.
Three balloons for Lincoln and two for Jude. I ran across these little dino sippy cups at Menards of all places. They worked perfectly with the theme so I couldn't resist!
The party hats and the cupcakes were ideas from this gal. Her party was WAY cuter than mine. Great ideas over there. You can't really see Lincoln's hat very well, but it has spikes along the back. He really wanted to "smile" for me and wouldn't turn around completely for me to see his hat. Funny boy. Anyway, they turned out pretty cute.
I think the cupcakes were my favorite. I picked up the mini dinos at the dollar store and then just made cupcakes from box mix. It's funny how piping frosting on the top makes them look like I worked hours on them! I didn't.
The boys enjoyed themselves thoroughly. The party was a bit chaotic, but we had a good time.
Happy birthday to you, Mr. Jude. You make us SO happy!
April 29, 2012
Spring Living Room
I'm working slowly to bring some spring into our living room. I like to change things up with the seasons, apparently.
When we first moved in I changed the style of our photo collage in the living room. I painted the frames white and I love how it flows with the matte in each frame. Each January I sort through pictures from the previous year and add a new set. Cheap thrill.
I also changed the layout of the photos. In the last house you can see the collage here. This time I used this inspiration from Martha Stewart. Love that Martha.

Here it is in better light. I made two of each pillow.
And, here's the look of our living room currently.
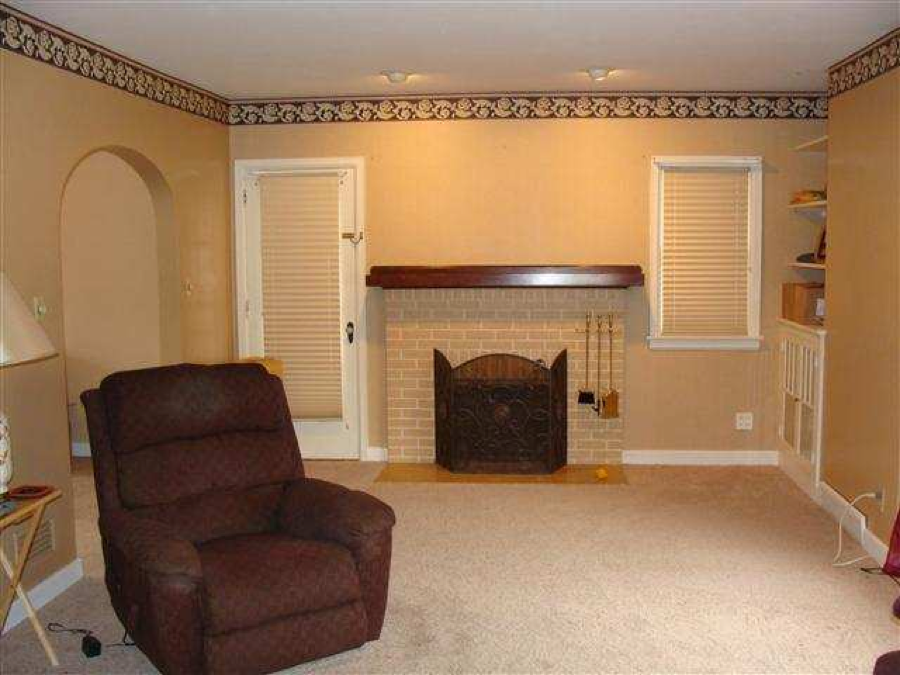
Still a work in progress, but definitely a step up from when we bought it 9 months ago. This was a picture from the realtor's site and is the only "before" picture I have on this computer.
When we first moved in I changed the style of our photo collage in the living room. I painted the frames white and I love how it flows with the matte in each frame. Each January I sort through pictures from the previous year and add a new set. Cheap thrill.
I also changed the layout of the photos. In the last house you can see the collage here. This time I used this inspiration from Martha Stewart. Love that Martha.
I decided some spring pillows were in order. The ones from the last house just did not match anymore. We used them last summer after we had just moved in because it was all we had and they made my eyes twitch. Too much.
The striped pillows are just scraps of home decor fabric I had on hand. I pieced them together and came up with the stripes.
The blue came from a lovely linen fabric that Hobby Lobby has in their home decor section. I couldn't take my eyes off the color. I love it!
I added some flower detail using the freezer paper painting method. You know, my go-to method for just about everything! The piecing took awhile to put together, but I think it was totally worth it. The design came from this inspiration - found on Pinterest, of course.

Here it is in better light. I made two of each pillow.
And, here's the look of our living room currently.
Still a work in progress, but definitely a step up from when we bought it 9 months ago. This was a picture from the realtor's site and is the only "before" picture I have on this computer.
Subscribe to:
Posts (Atom)